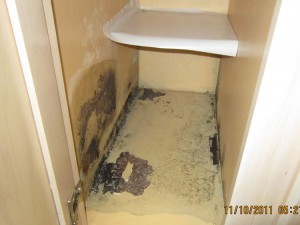
 If you’re like most people, you don’t want to wait around when you notice a mold problem. You want to fill a bucket with hot soapy water, or grab a bottle of your favorite cleaning product, and go to town! The sooner you get rid of that unsightly fungus, the better.
Unfortunately, the instinct to attack mold immediately often just makes it worse. This is because mold is a living thing. Getting rid of it requires a specific set of steps. Going about it too casually—or too impulsively—could very well make the problem worse.
To avoid spreading mold and making the problem worse, it’s always best to think before you scrub. By learning about the most common DIY mold removal mistakes, you’ll be able to deal with your mold more effectively.
1. Using whatever cleaning fluid you have
When it comes to DIY removal, what doesn’t kill mold makes it stronger. This is because mold uses whatever means it can to expand the colony and spread spores to new locations. Let’s say you find a problem area where mold has grown. You grab a cleaning product that isn’t designed to kill mold, spray it on the surface, and use a scrubber to remove the visible mold. The wall may look clean when you’re finished, but the mold is now spread over a wider surface area and will come back even stronger.
To avoid this, always use a product that’s specifically designed to deal with mold! The more professionally and seriously you treat the job, the more likely you’ll see good results.
2. Scrubbing stuff that isn’t mold
DIY mold removal takes time, energy and money. That’s why it pays to know for certain that what you’re dealing with is mold! It’s possible to encounter something that looks like mold but is actually grime, soot, dirt or some other natural material. In this case a simple cleaning will do. Spending the time and energy on DIV mold removal when it’s not even necessary is a common blunder!
3. Only cleaning what you can see
When you see evidence of mold on your walls, floors or ceilings, you can be reasonably sure that mold is also growing where you can’t see. Mold prefers dark, damp, undisturbed environments. It’s been known to grow on the insides of walls, underneath old floor panels, and many other places that are invisible until you open them up and take a look.
You can attack the mold that’s visible, but in many cases, this won’t rid you of the real problem. Professional mold removal involves a preliminary inspection to determine how extensive the infestation really is. Only when this inspection is complete does the cleanup process begin. Otherwise, your DIY efforts might amount to little more than a temporary fix.
4. Leaving yourself exposed
There’s no question that acute exposure to mold is no good for your health. It may seem like harmless green and black film, but the spores can easily enter your respiratory system while you’re scrubbing and cleaning. So if you’ve decided to go the DIY route, make sure to invest in protective gear for your hands, mouth, eyes and nose. Take a cue from professional mold remediation companies, who often tackle mold problems wearing full-body protection. It’s best to err on the side of caution when it comes to mold!
5. Cleaning what should be removed
Cleaning is the first line of defense against mold infestations—but it’s not the last. Sometimes even the most professional cleaning techniques will not solve the problem. For instance, when mold aggressively colonizes a surface that has a lot of pores (wood, fabric, wallpaper, insulation, etc), there is effectively no way to cleanse the material. In cases like this, the only thing that can be done is a careful and proper removal (and replacement) of the materials, in conjunction with other mold remediation techniques. Cleaning materials that are hopelessly lost to mold will, over time, exacerbate the problem.
Has this information on DIY mold removal been helpful? We welcome your questions and comments in the space below!

